Two fantastic artists; each hold a separate style; both share a similar interest. The two artists go by Daim and Kurt Wenner. Kurt specializes in anamorphic illusionistic style while Daim prefers his graffiti.
Daim is a professional German graffiti artist. He started his career in 1989 and has forever since then, explored the limits of his mind. His style and technique makes you feel like you’re lifting from your body, entering his realm of imagination. This quote will give a better descriptive explanation of his work. “His geometric figures and letters obey the laws of light and shadow but defy gravity and curve space. The beholder is sucked into the image or feels transported to new dimensions”
-DAIM graffiti art.
 In a fairly recent post, I briefly mentioned Kurt’s connection to the modern anamorphic illusionistic style of art. After his venture to Italy, Kurt brought back the idea of 3D street art. He became America’s founder of this world historic treasure.Both Kurt and Daim share their interest in the three dimensional world. They grew from their hobbies as amateurs to world renowned professionals. Geometry plays a vital role in both art forms. Kurt’s use of geometry and classicism gives a distortion making viewable from a specific angle. Daim’s use of it doesn’t give off as much of a distortion as Kurt. The last comment could be considered a difference too because their use of geometry is different, yet a similarity because it is vital for both to use it.Their difference lies in the art forms themselves. The style of graffiti and street art in attraction and perception. Street art pulls a more realistic classicism and expresses its dimensions. Daim’s graffiti shoots for a more quick, fashionable appeal. If you look at graffiti at any angle, you can still see the dimensional jump from 2D to 3D. Street art relies on a perspective and only one viewpoint. If you were to draw a person on the ground in 3D, if you stand next it, all it is is a bunch colors added together. View it from the front, you can start to see the painting come alive.Although these people share their differences, they still connect in a way with a few similarities. Both art fanatics still scour the globe spreading their passion and talent among everyone else.
Sources:
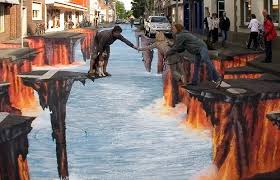 Street art; something that appeals to everybody. This art form has come as a great way for expression and a perfect portrayal of depth and dimension. I find this a my most favorite style; using the street and surroundings as your personal art gallery. Today’s post will discuss brief history of street art.
All that is Interesting says, “though the medium is widely regarded as a modern art, street art traces its origins back to the Renaissance.” Of everything I heard about this art form, I never heard about it’s origins in the Renaissance.
Kurt Wenner could be classified as today’s modern street art founder. The key words are could and modern. The reason I say this is because he was not the first person to start this style, for he was born until the 1900s. He traveled to Rome, Italy in 1982 to discover the madonnari unique form of art. After his return the U.S., he traveled to Santa Barbara Museum of Art to introduce his findings; thus, becoming the founder of the American style.
Mentioned before, “madonnari were italians that traveled between festivals that lived off of coins simply thrown to the side due to their visual talents.” They were the first founders of street art and they prospered in the time of the Renaissance. Madonnari wasn’t a family or person’s name, it was the title branded to a type of people based on occupation.
Kurt combined today’s modern style of street art with classical style painting to create his own form, now known as 3D street art. The original name of this style is called anamorphic illusionistic.
His painting and drawings have now become a sensation and discussed in at least a dozen different broadcasts, magazines, newspapers, and blogs since his return from Italy. Down below are two examples of Anamorphic Illusionistic style drawings.

Sources:
Have you ever wondered how to draw making something looking 3D? Well this style of art is called perspective. There's one, two, and three point perspective. The difficulty for each one follows in that same order, easiest, intermediate, and hard. Gif Peanut Butter says “first point perspective is not that much different from two. It’s a little simpler and straightforward.” This will be my how-to post for first point perspective of a room.
First Step:
The first thing you need to do is find the center of your paper. To do this, just measure half the length of your paper and draw a horizontal line. Then find half the width and draw a vertical line. Draw a dot/circle where they meet and erase excess markings. This now becomes your vanishing point(VP).
Second Step:
Draw an even square/rectangle around your VP. Keep in mind that this shape becomes the back wall of the room.
Third Step:
Draw a line from one inner corner of your box to the one opposite it. Repeat for the remaining two corners.
Line your ruler up with one of the diagonal lines, then continue each end of the line until it reaches the edge of your paper. Repeat for the other diagonal line. Erase the diagonal lines that are inside your box. You then will have a box with four diagonal lines on the outside. If done correctly, you now have a layout for your room.
Fourth Step:
Now, lets start with a dresser. Put your pencil somewhere on a bottom diagonal line(I would say around the middle of the line). From this spot, draw a line up, then a line horizontal toward the other diagonal line. These lines shouldn’t be drawn to high or too far left/right, depending on which diagonal you chose.
Finish drawing the rest of the box and erase the diagonal line in the box. Resulting in this:

Now, Draw a line from each corner to the VP(never draw a line from the farthest corner from the VP for it will be hidden behind the object). These lines going to the VP are receding lines.
Find the receding lines that are coming from the top two corners of the small box. Draw a horizontal line connecting the two lines. The spot where the receding and horizontal line meet(on the side closest to the middle of the paper), draw a vertical line down to the other receding line. Now erase the remaining receding lines from where you drew to the VP and any marks inside your box. Resulting in this:

Fifth Step:
It’s time for one last step, the window. On one wall of your room, draw two vertical lines parallel to each other. The distance separating them are up to you. First, draw a receding line from the line farthest the VP going to it. Repeat for the other end of the same line. If the inner vertical line was long enough, you should now have a rectangle on your wall. Erase extra lines not needed and excess receding lines. Resulting in this:

Sixth and Remaining Steps:
Now, it’s your turn to figure the rest out.
Sources:
Drawing photos courtesy of yours truly, Chris~Anonymous
